To the top of the document
Captiva
   
GMDE Start Page Load static TOC Load dynamic TOC Help?

Sump Replacement - LE5 or LE9

Removal Procedure


    758466
  1. Raise and support the vehicle. Refer to Lifting and Jacking the Vehicle .
  2. Place a drain pan under the sump drain plug.
  3. Remove the oil pan drain plug.
  4. Drain the engine oil.
  5. Remove the engine drive belt. Refer to Drive Belt Replacement : LE5 or LE9 .
  6. Remove the lower AC compressor bolt.

  7. 1578309
  8. Remove the 4 sump to transaxle bolts (1).
  9. Remove the oil pan bolts.

  10. 1578310
  11. Remove the sump
  12. Remove any old sump sealant (1).

Installation Procedure


    1578310
  1. Ensure that the sump and the sealing surface on the lower crankcase are free of all oil and debris.
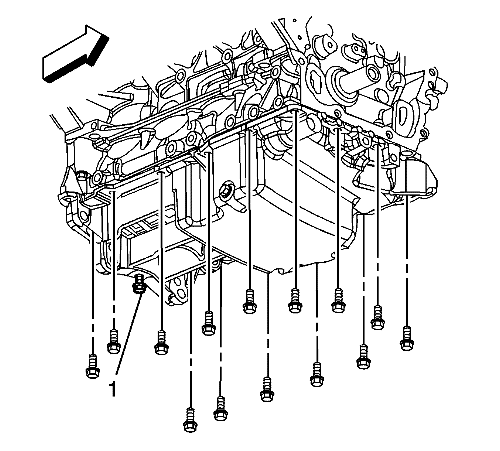
  2. Apply a 2 mm bead of sealant (1) around the perimeter of the sump and the oil suction port opening. DO NOT over apply the sealant. More than a 2 mm bead is not required. Refer to Adhesives, Fluids, Lubricants, and Sealers for the correct part number.
  3. Install the oil pan.

  4. 1578309
  5. Install the sump bolts.
  6. Caution: Refer to Fastener Caution in the Preface section.

  7. Install the 4 sump to transaxle bolts (1) and tighten to 75 N·m (55 lb ft).

  8. 466580
  9. Tighten the sump bolts in the sequence shown to 25 N·m (18 lb ft).
  10. Install the lower AC compressor bolt.
  11. Install the engine drive belt. Refer to Drive Belt Replacement : LE5 or LE9 .
  12. Lower the vehicle.
  13. Fill the engine oil to the proper level.


© Copyright Chevrolet. All rights reserved