Fuel Pump Replacement
Special Tools
EN-48896 High Pressure Fuel Pump Installation Alignment Gauge
For equivalent regional tools, refer to
Special Tools : Diagnostic Tools Diesel .
Removal Procedure
- Relieve the low and high side fuel system pressure. Refer to Fuel Pressure Relief .
- Remove the high pressure fuel pump shield. Refer to
Fuel Pipe Shield Replacement : LF1 or LFW .
- Disconnect the engine wiring harness electrical connector from the high pressure fuel pump.
- Remove the low pressure feed pipe. Refer to
Fuel Feed Pipe Replacement : LF1 or LFW .
- Remove the high pressure pipe. Discard the pipe. Refer to
Fuel Feed Intermediate Pipe Replacement : LF1 or LFW .
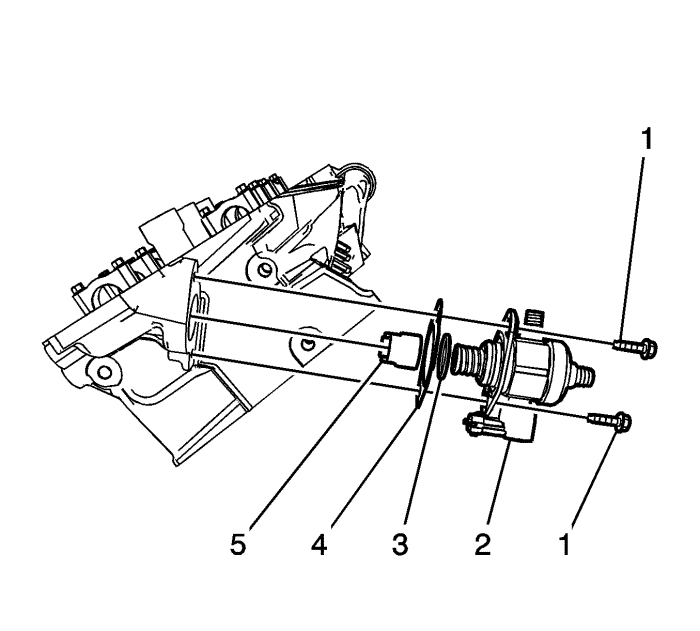
- Remove and discard the high pressure fuel pump bolts (1).
- Remove the high pressure fuel pump (2).
- Remove and discard the high pressure fuel pump O-ring (3).
- Remove and discard the high pressure fuel pump gasket (4).
- Remove the high pressure fuel pump roller lifter (5).
Installation Procedure
Note: The camshaft must be in the base circle position before the high pressure fuel pump is installed.
- Use the EN-48896 alignment gauge to ensure that the camshaft lobe is in the base circle position. At base circle the tool will be flush with the head.
- Lubricate the high pressure fuel pump cylinder head bore and roller lifter with camshaft prelube. Refer to Adhesives, Fluids, Lubricants, and Sealers .
Note: The high pressure fuel pump gasket has a retaining feature to hold the pump retaining bolts in place.
- Install the high pressure fuel pump roller lifter (5).
- Install a NEW high pressure fuel pump O-ring (3).
- Position the NEW high pressure fuel pump gasket (4) and bolts (1) to the fuel pump.
- Install the high pressure fuel pump (2). Force will be required while hand tightening the bolts.
Caution: Refer to Fastener Caution in the Preface section.
- Tighten the high pressure fuel pump retaining bolts to 15 N·m (11 lb ft).
- Ensure the high pressure fuel pump and fuel rail fittings are clean prior to assembly.
- Install a NEW high pressure fuel pipe. Refer to
Fuel Feed Intermediate Pipe Replacement : LF1 or LFW .
- Install the fuel feed pipe to the high pressure fuel pump. Refer to
Fuel Feed Pipe Replacement : LF1 or LFW .
- Connect the high pressure fuel pump wiring harness.
- Install the fuel tank cap.
Note: If a fuel leak accrues at the fuel rail, the fuel rail will need to be replaced.
- Inspect for leaks using the following procedure:
| 13.1. | Turn ON the ignition, with the engine OFF for 2 seconds. |
| 13.2. | Turn OFF the ignition, for 10 seconds. |
| 13.3. | Turn ON the ignition, with the engine OFF. |
| 13.4. | Inspect for fuel leaks. |
- Install the pressure relief cap to the fuel feed pipe.
- Install the inlet manifold. Refer to Inlet Manifold Replacement .
- Install the high pressure fuel pump shield. Refer to
Fuel Pipe Shield Replacement : LF1 or LFW .
| © Copyright Chevrolet. All rights reserved |


