Instrument Panel Tie Bar Replacement
Removal Procedure
Note: Left hand drive vehicle is shown in this procedure, right hand drive vehicle is serviced the same.
- Disable the SIR system. Refer to SIR Disabling and Enabling .
- Disconnect the battery negative cable. Refer to Battery Negative Cable Disconnection and Connection .
- Remove the instrument panel assembly. Refer to
Instrument Panel Assembly Replacement : Long Body → Short Body .
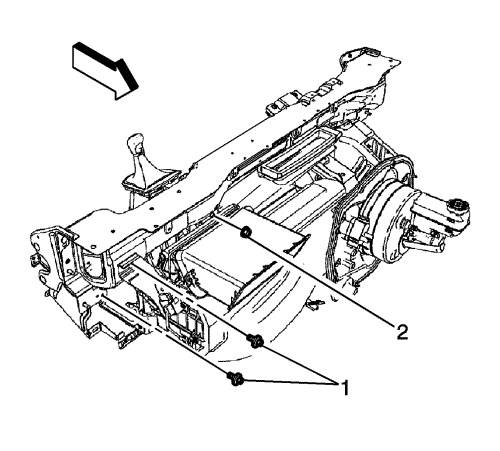
- Remove the HVAC module bolts (1).
- Remove the HVAC module nut (2).
- Remove the clutch pedal, if equipped with manual gearbox. Refer to Clutch Pedal Replacement .
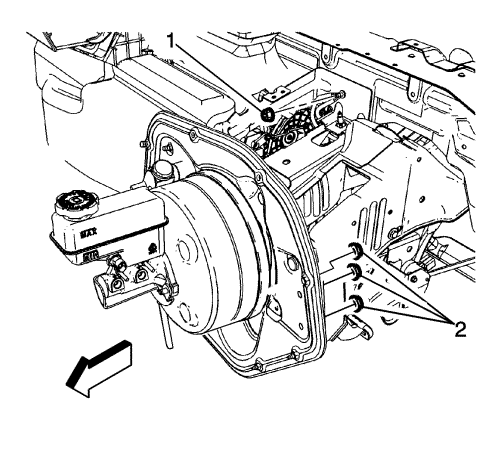
- Remove the HVAC module wiring harness nut (1).
- Remove the instrument panel tie bar nuts (2).
- Remove the HVAC module bolt (1) and nut (1).
- Remove the instrument panel tie bar bolt (2) and nuts (2).
Note: Note the location and routing of the electrical harness prior to disconnecting or removing in order to ensure the proper re-installation.
- Disconnect the instrument panel wiring harness connectors and ground straps at the following locations.
| • | At both windscreen pillars |
| • | At the steering column bracket |
- Remove the instrument panel electrical centre. Refer to Instrument Panel Wiring Harness Junction Block Replacement .
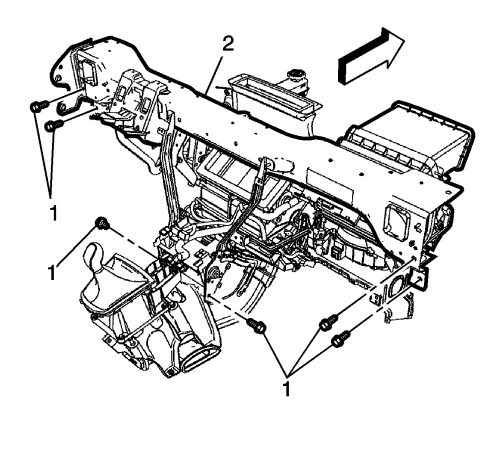
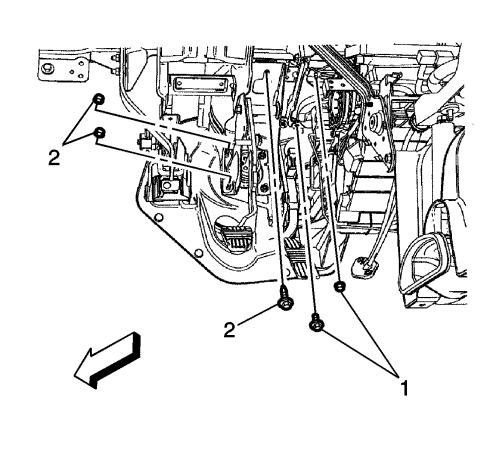
- Remove the instrument panel tie bar bolts (1).
- With the aid of an assistant remove the instrument panel tie bar assembly (2) from the vehicle.
Installation Procedure
Caution: Refer to Fastener Caution in the Preface section.
- Position the instrument panel tie bar assembly (2) in the vehicle.
- Install the instrument panel bolts (1) and tighten to 22 N·m (16 lb ft).
- Install the instrument panel electrical centre. Refer to Instrument Panel Wiring Harness Junction Block Replacement .
- Connect the instrument panel electrical connectors and ground straps at the following locations.
| • | At the steering column bracket |
| • | At both windscreen pillars |
- Install the instrument panel tie bar bolt (2) and nuts (2) and tighten to 22 N·m (16 lb ft).
- Install the HVAC module bolt (1) and nut (1) and tighten to 8 N·m (71 lb in).
- Install the instrument panel tie bar nuts (2) and tighten to 22 N·m (16 lb ft).
- Install the HVAC module wiring harness nut (1) and tighten to 8 N·m (71 lb in).
- Install the clutch pedal, if equipped with manual gearbox. Refer to Clutch Pedal Replacement .
- Install the HVAC module bolts (1) and nut (2) and tighten to 8 N·m (71 lb in).
- Install the instrument panel assembly. Refer to
Instrument Panel Assembly Replacement : Long Body → Short Body .
- Connect the battery negative cable. Refer to Battery Negative Cable Disconnection and Connection .
- Enable the SIR system. Refer to SIR Disabling and Enabling .
| © Copyright Chevrolet. All rights reserved |


