Body Wiring Harness Replacement - 5-Door Hatchback 68, Left Hand Drive
Special Tools
| • | EL-47955 Multi Diagnostic Interface MDI |
For equivalent regional tools, refer to Special Tools .
Removal Procedure
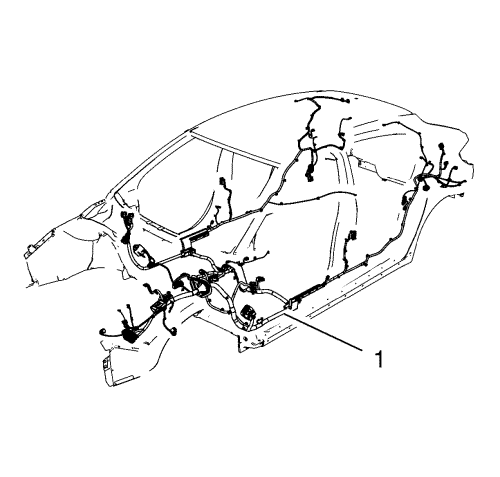
Note: For a better description the following graphic shows the vehicle without attaching parts.

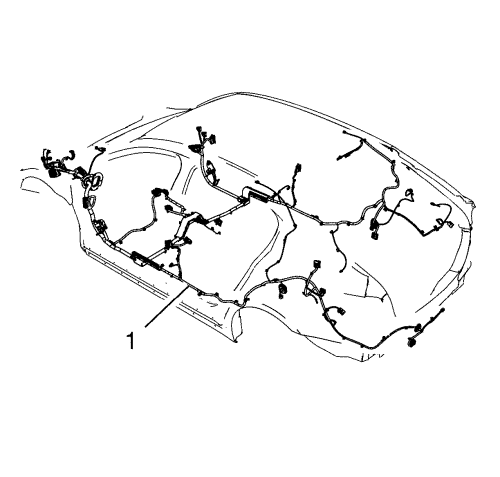
Note: For a better description the following graphic shows the vehicle without attaching parts.

Note: Arrange a place to embed the removed parts.
- Install the EL-47955 MDI , turn on the ignition and read out the trouble codes.
Delete them and read out the trouble codes again. If there are any trouble codes notice them.
- Open the hood and remove the battery and the battery tray. Refer to Battery Replacement and Battery Tray Replacement .
- Remove the front floor panel carpet. Refer to Front Floor Panel Carpet Replacement .
- Remove the luggage shade. Refer to Luggage Shade Replacement .
- Remove the radio rear compartment speaker. Refer to Radio Rear Compartment Speaker Replacement .
- Remove the rear seat. Refer to Rear Seat Replacement .
- Remove the left and right body side trim panel. Refer to Body Side Trim Panel Replacement .
- Remove the left and right quarterlight garnish moulding. Refer to Quarterlight Garnish Moulding Replacement .
- Remove the radio speaker amplifier. Refer to Radio Speaker Amplifier Replacement .
- Pass the parts in the work area.
- Make pictures for correct orientation.
- Remove the left and right centre pillar lower garnish moulding. Refer to Centre Pillar Lower Garnish Moulding Replacement .
- Remove the headlining trim panel. Refer to Headlining Trim Panel Replacement .
- Pass the parts in the work area.
- Make pictures for correct orientation.
- Lift up the vehicle. Refer to Lifting and Jacking the Vehicle .
- Remove all rear wheelhouse panel liner. Refer to Rear Wheelhouse Panel Liner Replacement .
- Disconnect the body wiring harness from the electrical park brake.
- Remove the body wiring harness from the fuel tank filler door lock actuator.
- Remove the windscreen washer solvent container. Refer to Windscreen Washer Solvent Container Replacement .
- Disconnect body wiring harness from steering gear.
- Pass the parts in the work area.
- Make pictures for correct orientation.
- Lift down the vehicle. Refer to Lifting and Jacking the Vehicle .
- Remove the fuse block. Refer to Fuse Block Replacement .
- Remove the front compartment fuse block. Refer to Front Compartment Fuse Block Replacement .
- Pass the parts in the work area.
- Make pictures for correct orientation.
- Remove the brake, accelerator, and clutch pedal. Refer to Brake, Accelerator, and Clutch Pedal Replacement .
- Remove the instrument panel. Refer to Instrument Panel Assembly Replacement .

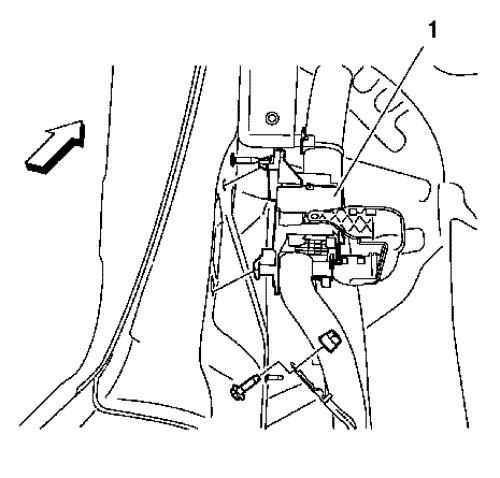
- Release the X1 (1) plug connector from the a-pillar. Use the BO-569-A plug lifter .
- Release all fixations.
- Take care about destroyed cable straps and harness guidance regarding noises and rattle.
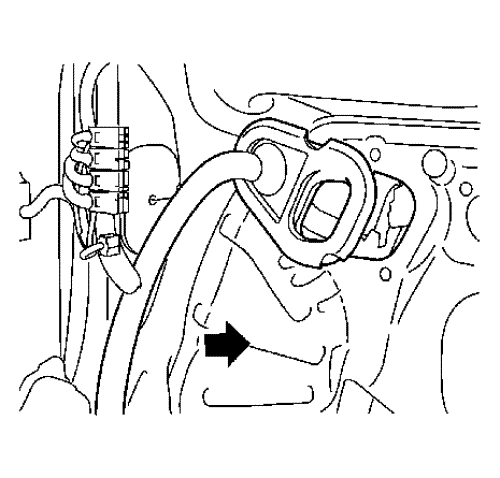
- Remove the body wiring harness guidance in the bulkhead and draw-out the body wiring harness from the engine compartment through the passenger compartment.

- Remove the old body wiring harness and lay it on the floor.
- Unpack the new body wiring harness and compare the old with the new harness concerning quantity of fixing points, cable straps, guides, part numbers and pin assignments.
Installation Procedure
- After comparing the new with the old harness lay the new body wiring harness into the passenger compartment and carry the new harness through the bulkhead into the engine compartment.
Note: Take care for the leak tightness.
- Then install the wiring harness guidance in the bulkhead.
- Now check that there is no rotation and fix the new body wiring harness.
Note: Take care for the correct counterpart and the pin assignment. Use the pictures for orientation.
- Connect all electrical connectors.
Caution: Refer to Fastener Caution in the Preface section.
- Tighten all mass cables to the weld studs with 9 N·m (80 lb in).
- Install the instrument panel. Refer to Instrument Panel Assembly Replacement .
- Install the brake, accelerator, and clutch pedal. Refer to Brake, Accelerator, and Clutch Pedal Replacement .
- Show pictures for correct orientation.
- Install the front compartment fuse block. Refer to Front Compartment Fuse Block Replacement .
- Install the fuse block. Refer to Fuse Block Replacement .
- Lift up the vehicle. Refer to Lifting and Jacking the Vehicle .
- Show pictures for correct orientation.
- Connect the body wiring harness to the steering gear.
- Install the windscreen washer solvent container. Refer to Windscreen Washer Solvent Container Replacement .
- Install the body wiring harness to the fuel tank filler door lock actuator.
- Connect the body wiring harness from the electrical park brake.
- Install all rear wheelhouse panel liner. Refer to Rear Wheelhouse Panel Liner Replacement .
- Lift down the vehicle. Refer to Lifting and Jacking the Vehicle .
- Show pictures for correct orientation.
- Install the headlining trim panel. Refer to Headlining Trim Panel Replacement .
- Install the left and right centre pillar lower garnish moulding. Refer to Centre Pillar Lower Garnish Moulding Replacement .
- Install the radio speaker amplifier. Refer to Radio Speaker Amplifier Replacement .
- Install the left and right quarterlight garnish moulding. Refer to Quarterlight Garnish Moulding Replacement .
- Install the left and right body side trim panel. Refer to Body Side Trim Panel Replacement .
- Install the rear seat. Refer to Rear Seat Replacement .
- Install the radio rear compartment speaker. Refer to Radio Rear Compartment Speaker Replacement .
- Install the luggage shade. Refer to Luggage Shade Replacement .
- Install the front floor panel carpet. Refer to Front Floor Panel Carpet Replacement .
- Install the battery tray. Refer to Battery Tray Replacement .
- Install the EL-47955 MDI , turn on the ignition and read out the trouble codes.
If there are any stored DTCs delete them and read out the trouble codes again.
- Align the headlamps. Refer to Headlamp Aiming .
- Program the volatile memory and then check all electrical functions and make a test run.
- Clean the car outside and inside.
| © Copyright Chevrolet. All rights reserved |


