Front Brake Calliper Overhaul
Disassembly Procedure
Warning: Refer to Brake Dust Warning in the Preface section.
Warning: Refer to Brake Fluid Irritant Warning in the Preface section.
Warning: Do not place fingers in front of the calliper piston(s) in an attempt to catch or protect it when applying compressed air. The piston(s) can fly out with force and could result in serious bodily injury.
Caution: Use clean cloths to pad interior of calliper housing during piston removal. Use just enough air to ease the pistons out of the bores. If the pistons are blown out, even with the padding provided, it may be damaged.
- Remove the brake calliper from the vehicle. Refer to Front Brake Calliper Replacement .
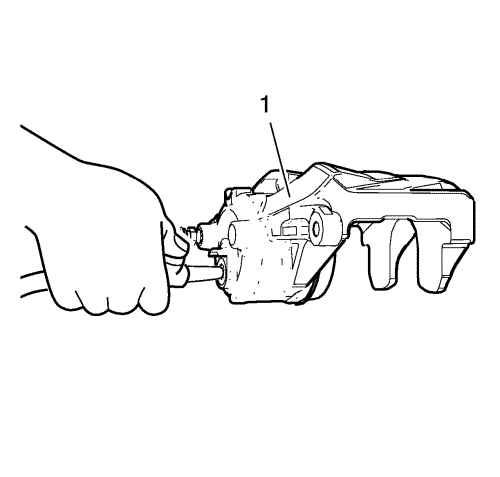
- Remove the brake calliper piston from the calliper bore by directing low pressure compressed air into the calliper (1) through the fluid inlet hole.
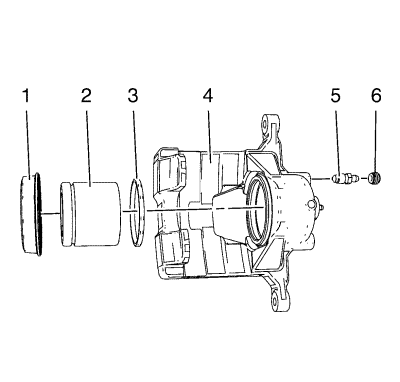
- Remove the piston dust boot seal (1) from the seal counterbore in the calliper (4). Discard the boot seal.
- Using a small wooden or plastic tool, remove the piston seal (3) from the calliper bore. Discard the piston seal.
- Remove the bleeder valve cap (6).
- Remove the bleeder valve (5).
Note: Do not use abrasives to clean the brake calliper piston.
- If cracks, scoring, pitting, excessive rust, and/or excessive corrosion are present in the calliper bore, replace the calliper assembly.
- If light rust or light corrosion are present in the calliper bore, attempt to remove the imperfection with a fine emery paper. If the imperfection cannot be removed, replace the calliper assembly.
- Clean the brake calliper piston bore and seal counterbore, and the calliper piston with methylated spirit, or equivalent.
- Dry the calliper piston bore and counterbore, and the piston with non-lubricated, filtered, compressed air.
- Inspect the calliper piston for cracks, scoring, and/or damage to the plating. Replace the calliper piston if any of these conditions exist.
- Inspect the calliper mounting holes for cracks, scoring, pitting, rust and/or excessive corrosion. Replace the calliper assembly if any of these conditions exist.
Assembly Procedure
- Lubricate the new piston seal (3) with brake fluid from a clean, sealed brake fluid container. Refer to Adhesives, Fluids, Lubricants, and Sealers for the recommended brake fluid.
- Install the lubricated, new piston seal (3) into the calliper bore.
- Apply a thin coat of brake fluid from a clean, sealed brake fluid container. Refer to Adhesives, Fluids, Lubricants, and Sealers for the recommended brake fluid.
- Install the bottom half of the calliper piston (2) into the calliper bore.
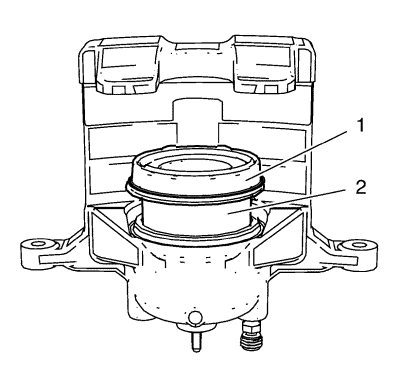
- Install the new piston dust boot seal (1) over the calliper piston (2).
- Compress the calliper piston (2) to the bottom of the calliper bore.
- Fully seat the piston dust boot seal (1) into calliper counterbore.
Caution: Refer to Fastener Caution in the Preface section.
- Install the bleeder valve (5) to the calliper and tighten the valve to 17 N·m (13 lb ft).
- Install the bleeder valve cap (6).
- Install the brake calliper to the vehicle. Refer to Front Brake Calliper Replacement .
| © Copyright Chevrolet. All rights reserved |


