To the top of the document
Captiva
   
GMDE Start Page Load static TOC Load dynamic TOC Help?

Fuel Tank Replacement - AWD

Removal Procedure

    Warning: Do not allow smoking or the use of naked flames in the area where work on the fuel or EVAP system is taking place. Anytime work is being done on the fuel system, disconnect the negative battery cable, except for those tests where battery voltage is required.

  1. Ensure that the fuel level in the tank is less than 1/4 full. If necessary, drain the fuel tank to at least this level. Refer to Fuel Tank Draining .
  2. Warning: Fuel supply lines will remain pressurised for a long period of time after the engine is shutdown. This pressure must be relieved before servicing the fuel system.

  3. Relieve the fuel system pressure. Refer to Fuel Pressure Relief .
  4. Disconnect the negative battery cable. Refer to Battery Negative Cable Disconnection and Connection .
  5. Raise and support the vehicle. Refer to Lifting and Jacking the Vehicle .
  6. Remove the exhaust system. Refer to Exhaust Muffler Replacement : NB5 .
  7. Remove the propeller shaft. Refer to Propeller Shaft Replacement .

  8. 1371133

    Warning: Whenever fuel lines are removed, catch fuel in an approved container. Container opening must be a minimum of 300 mm (12 in) diameter to adequately catch the fluid.

    Caution: Clean all fuel pipe connections and surrounding areas before disconnecting the fuel pipes to avoid contamination of the fuel system.

  9. Place a suitable container under the fuel line connection in order to catch any dripping fuel.
  10. Remove the evaporative emission canister . Refer to Evaporative Emission Canister Replacement .
  11. Disconnect the chassis fuel supply line (2) from the fuel tank.

  12. 1347586
  13. Disconnect the fuel filler tube, EVAP vent hose, and fresh air hose from the fuel tank.
  14. Disconnect the fuel tank electrical connector and remove the electrical connector retainer from the rear frame.

  15. 1884595

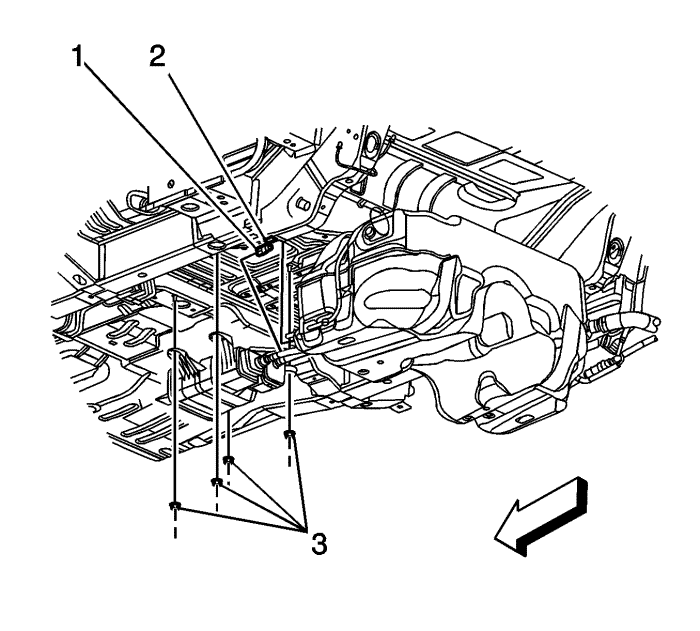
    Caution: Do not bend the fuel tank straps. Bending the fuel tank straps may cause damage to the straps.

  16. Using a suitable adjustable jack, support the fuel tank.
  17. Remove the fuel tank strap nuts and lower the fuel tank straps.
  18. Note: Be careful to clear the fuel tank strap studs.

  19. Lower the front of the fuel tank (with shield), and pull the tank forward to clear the rear drive module.
  20. If replacing the fuel tank, remove the fuel tank module assemblies. Refer to Fuel Tank Fuel Pump Module Replacement and Fuel Tank Fuel Pump Module Replacement - Secondary : Without .
  21. If replacing the fuel tank, remove the heat shield, hoses and wiring harness and transfer to the new tank.

Installation Procedure

  1. If previously removed, install the fuel tank module assemblies. Refer to Fuel Tank Fuel Pump Module Replacement and Fuel Tank Fuel Pump Module Replacement - Secondary : Without .

  2. 1884595

    Note: Be careful to clear the fuel tank strap studs.

  3. Using a suitable adjustable jack, install the fuel tank heat shield and fuel tank assembly to the vehicle.
  4. Caution: Refer to Fastener Caution in the Preface section.

  5. Install the fuel tank straps and the fuel tank strap-to-body nuts and tighten to 20 N·m (15 lb ft).

  6. 1347586
  7. Connect the fuel tank electrical connector and install the electrical connector retainer to the rear frame.
  8. Connect the EVAP vent, and fresh air hoses to the fuel tank.
  9. Connect the fuel filler tube to the fuel tank. Tighten the fuel filler tube clamp to 5 N·m (44 lb in).

  10. 1371133
  11. Connect the chassis fuel supply line (2) to the fuel tank.
  12. Install the evaporative emission canister . Refer to Evaporative Emission Canister Replacement .
  13. Install the propeller shaft. Refer to Propeller Shaft Replacement .
  14. Install the exhaust system. Refer to Exhaust Muffler Replacement : NB5 .
  15. Lower the vehicle.
  16. Fill the fuel tank with petrol.
  17. Connect the negative battery cable. Refer to Battery Negative Cable Disconnection and Connection .
  18. Prime the fuel system:
  19. 14.1. Cycle the ignition ON for 5 seconds and then OFF for 10 seconds.
    14.2. Repeat the previous step twice.
    14.3. Crank the engine until it starts. The maximum starter motor cranking time is 20 seconds.
    14.4. If the engine does not start, repeat steps 14.1-14.3.


© Copyright Chevrolet. All rights reserved