Fuel Tank Replacement
Removal Procedure
Warning: Do not allow smoking or the use of naked flames in the area where work on the fuel or EVAP system is taking place. Anytime work is being done on the fuel system, disconnect the negative battery cable, except for those tests where battery voltage is required.
Warning: Fuel supply lines will remain pressurised for a long period of time after the engine is shutdown. This pressure must be relieved before servicing the fuel system.
- Relieve the fuel pressure. Refer to Fuel Pressure Relief .
- Disconnect the negative battery cable. Refer to Battery Negative Cable Disconnection and Connection .
- Ensure that the fuel level in the tank is less than 1/4 full. If necessary, drain the fuel tank to at least this level. Refer to Fuel Tank Draining .
- Remove the exhaust muffler assembly. Refer to
Front Pipe Replacement : LNQ → LF1 → LE5 .
- Remove the propeller shaft, if equipped. Refer to Propeller Shaft Replacement .
- Disconnect the fuel tank electrical harness to body pass-through connector.
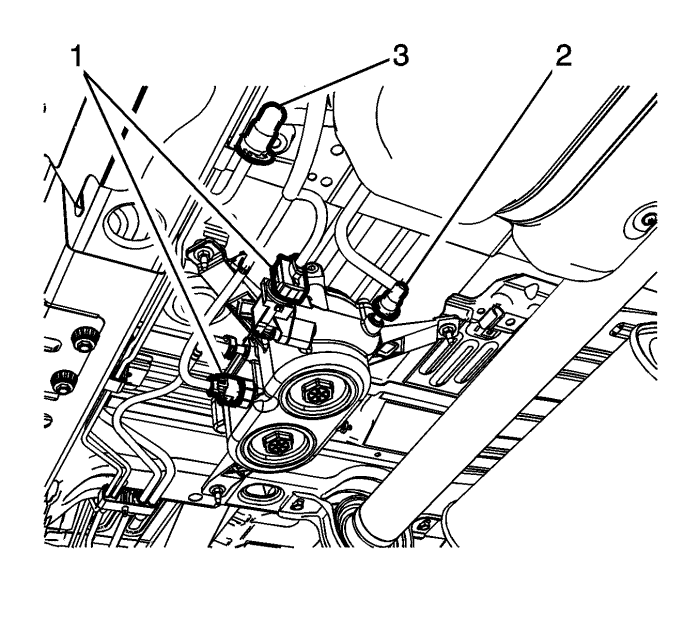
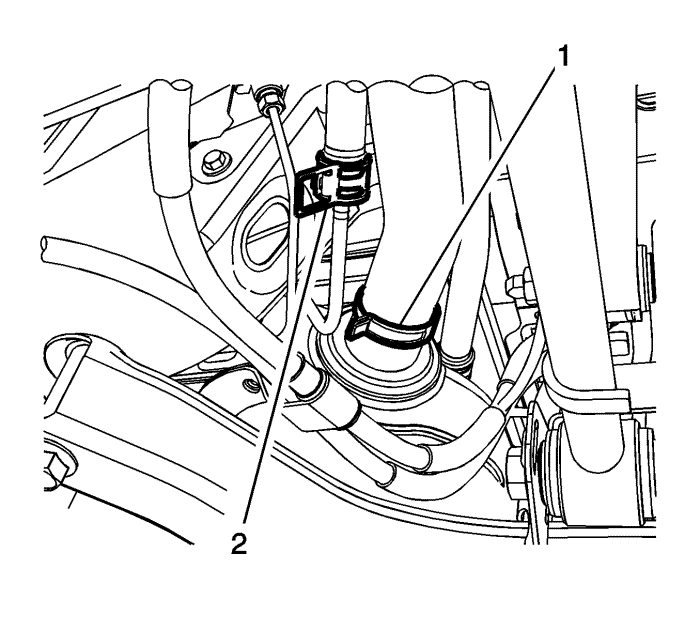
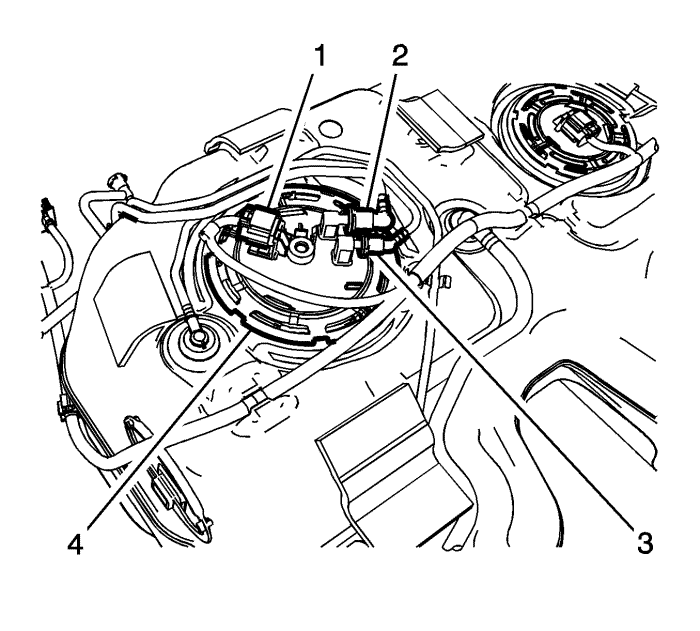
- Disconnect the fuel tank fuel feed line quick connect fitting (2) and the fuel return line (3) quick connect fitting from the fuel filter assembly. Refer to Plastic Collar Quick Connect Fitting Service .
- Disconnect the electrical harness connectors (1) from the fuel filter assembly.
- Loosen the fuel fill pipe hose clamp (1) at the fuel tank.
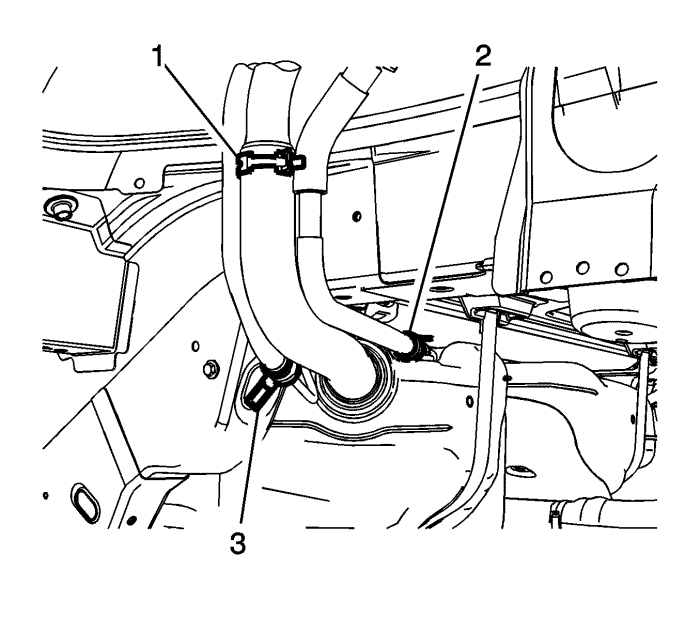
- Disconnect the fuel tank vent hoses (2, 3) from the fuel vent pipes.
- Using a suitable adjustable jack, support the fuel tank.
Caution: Do not bend the fuel tank straps. Bending the fuel tank straps may cause damage to the straps.
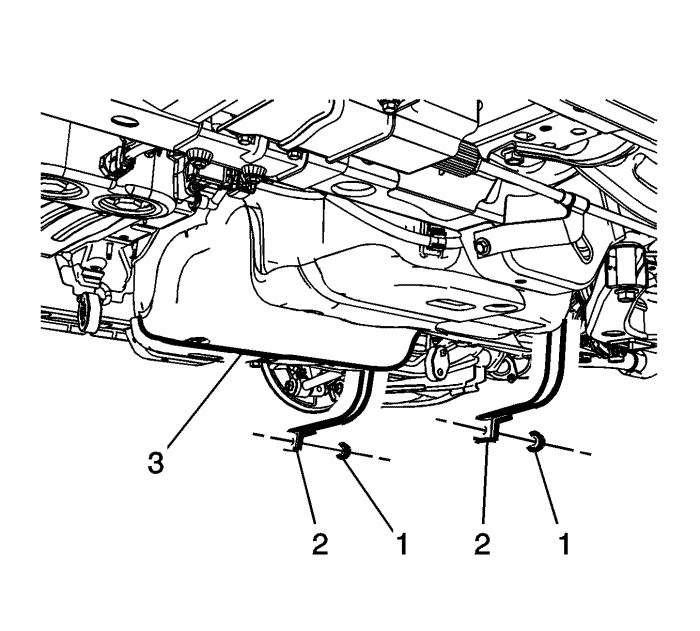
- Remove the fuel tank strap nuts (1) and lower the straps (2).
- Using the adjustable jack, slowly lower and reposition the fuel tank (3) in order to remove the tank from the vehicle. Using the adjustable jack, slowly lower the front of the fuel tank. Pull the fuel tank forward to clear the rear drive module (RDM), if equipped, and remove the fuel tank assembly with shield from the vehicle.
- If replacing the fuel tank perform the following steps, otherwise proceed to the Installation Procedure.
Disassembly Procedure
- Disconnect the fuel tank wiring harness electrical connectors (1, 5) from the fuel tank pump module and the fuel level sensor.
- Remove the fuel tank vent pipes from the fuel tank.
- Remove the fuel tank fuel pump modules. Refer to Fuel Tank Fuel Pump Module Replacement and Primary Fuel Level Sensor Replacement .
- Remove the fuel tank shield retainers and shield.
Assembly Procedure
Caution: Refer to Fastener Caution in the Preface section.
- Install the fuel tank shield retainers and shield. Tighten the screws to 10 N·m (88 lb in).
- Install the fuel tank fuel pump modules. Refer to Fuel Tank Fuel Pump Module Replacement and Primary Fuel Level Sensor Replacement .
- Install the fuel tank vent pipes from the fuel tank.
- Connect the fuel tank wiring harness electrical connectors (1, 5) to the fuel tank pump module and the fuel level sensor.
Installation Procedure
- Using the adjustable jack, slowly raise and reposition the fuel tank (3) in order to install the tank to the vehicle.
Caution: Do not bend the fuel tank straps. Bending the fuel tank straps may cause damage to the straps.
- Install the fuel tank straps (2) and nuts (1) and tighten to 20 N·m (15 lb ft).
- Remove the adjustable jack from under the fuel tank.
- Connect the fuel tank vent hoses (2, 3) to the fuel vent pipes.
- Connect the fuel fill pipe hose to the fuel tank and install the clamp (1).
- Connect the electrical harness connectors (1) to the fuel filter assembly.
- Connect the fuel tank fuel feed line quick connect fitting (2) and the fuel return line (3) quick connect fitting to the fuel filter assembly. Refer to Plastic Collar Quick Connect Fitting Service .
- Connect the fuel tank electrical harness to body pass-through connector.
- Install the propeller shaft. Refer to Propeller Shaft Replacement .
- Install the exhaust system. Refer to
Front Pipe Replacement : LNQ → LF1 → LE5 .
- Connect the negative battery cable. Refer to Battery Negative Cable Disconnection and Connection .
- Perform the fuel system priming procedure and inspect for leaks. Refer to Fuel System Priming .
| © Copyright Chevrolet. All rights reserved |


