Power Vacuum Brake Booster Replacement — RHD 3.0L
Removal Procedure
Warning: Refer to Brake Fluid Irritant Warning in the Preface section.
Caution: Refer to Brake Fluid Effects on Paint and Electrical Components Caution in the Preface section.
- Remove the master cylinder. Refer to
Master Cylinder Replacement : RHD → LHD .
- Carefully position aside the brake pipes and secure with heavy mechanics wire or equivalent.
- Remove the power brake booster vacuum check valve and hose from the power vacuum brake booster and position aside. Refer to
Power Brake Booster Vacuum Check Valve and Hose Replacement : RHD 2.0L, 2.2L Diesel → LHD 2.0L, 2.2L Diesel → RHD 3.0L → RHD 2.4L → LHD 3.0L → LHD 2.4L .
- Remove the throttle body assembly. Refer to
Throttle Body Assembly Replacement : LF1 or LFW .
- Remove the evaporative emission canister purge solenoid valve. Refer to
Evaporative Emission Canister Purge Solenoid Valve Replacement : LF1 or LFW .
- Remove the driver knee bolster. Refer to
Driver Knee Bolster Replacement : Long Body → Short Body .
- Disconnect the brake pedal position sensor electrical connector.
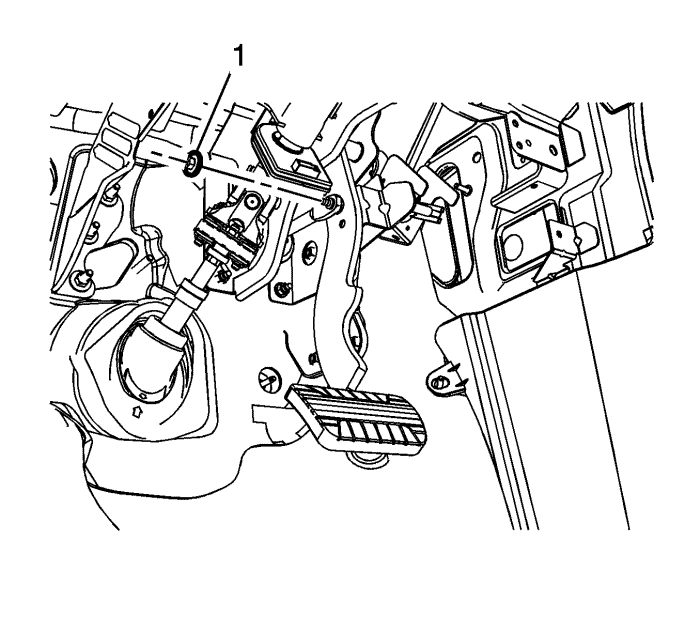
- Remove the power vacuum brake booster pushrod nut (1) and disconnect the power vacuum brake booster pushrod from the brake pedal.
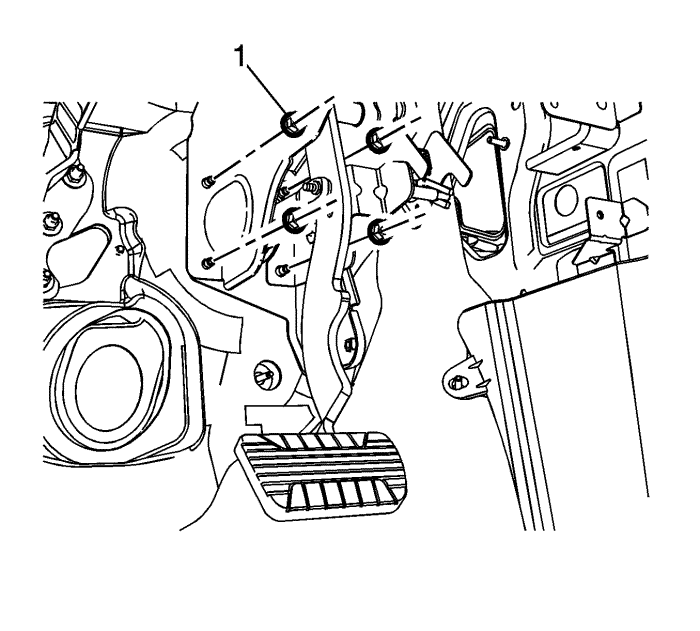
- Remove the power vacuum brake booster nuts (1).
- Lower the the frame with the powertrain assembly sufficiently to allow removal of the power vacuum brake booster. Refer to Frame Replacement .
Note: Ensure the foam insulator on the mounting surface of the power vacuum brake booster withdraws with the booster.
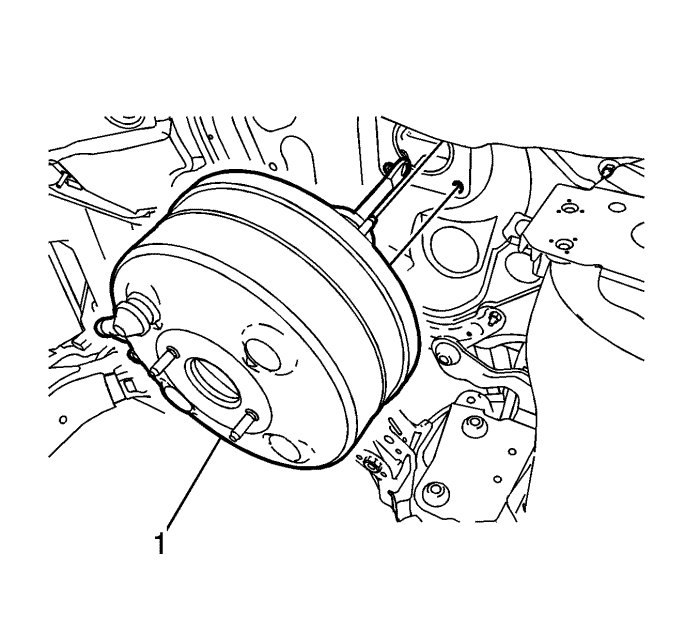
- Carefully pull the power vacuum brake booster (1) forward until the mounting studs clear the dash panel.
- Remove the power vacuum brake booster.
- Inspect the power vacuum brake booster gasket for damage and replace, if necessary.
Installation Procedure
- Position the power vacuum brake booster gasket to the dash panel, if removed.
- Install the power vacuum brake booster.
Note: Ensure the foam insulator on the mounting surface of the power vacuum brake booster is properly installed on the booster.
- While guiding the power vacuum brake booster pushrod and mounting studs through the dash panel, install the power vacuum brake booster (1).
- Raise and install the the frame with the powertrain assembly. Refer to Frame Replacement .
Caution: Refer to Fastener Caution in the Preface section.
- Install the power vacuum brake booster nuts (1) and tighten to 22 N·m (16 lb ft)..
- Install the power vacuum brake booster pushrod to the brake pedal.
- Install the power vacuum brake booster pushrod nut (1) and tighten to 9 N·m (80 lb ft).
- Connect the brake pedal position sensor electrical connector.
- Install the driver knee bolster. Refer to
Driver Knee Bolster Replacement : Long Body → Short Body .
- Install the evaporative emission canister purge solenoid valve. Refer to
Evaporative Emission Canister Purge Solenoid Valve Replacement : LF1 or LFW .
- Install the throttle body assembly. Refer to
Throttle Body Assembly Replacement : LF1 or LFW .
- Install the power brake booster vacuum check valve and hose to the power vacuum brake booster. Refer to
Power Brake Booster Vacuum Check Valve and Hose Replacement : RHD 2.0L, 2.2L Diesel → LHD 2.0L, 2.2L Diesel → RHD 3.0L → RHD 2.4L → LHD 3.0L → LHD 2.4L .
- Install the master cylinder . Refer to
Master Cylinder Replacement : RHD → LHD .
| © Copyright Chevrolet. All rights reserved |


