Transmission Replacement - Diesel Engine
Removal Procedure
- Remove the battery and battery tray. Refer to Battery Tray Replacement
- Without draining the coolant or removing the hoses, remove and position aside the radiator surge tank. Refer to
Radiator Surge Tank Replacement : Diesel → Gasoline Engines .
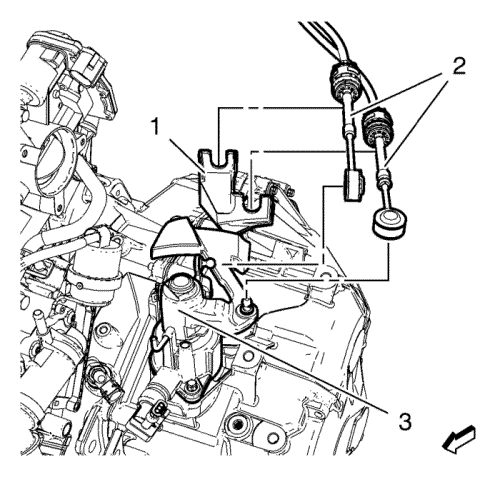
- Disconnect the electrical connector from the transmission control housing (3).
- Remove shift lever and selector lever cable (2) from the transmission control housing (3).
- Remove shift lever and selector lever cable (2) from the shift lever and selector lever cable bracket (1) by pushing back locking rings.
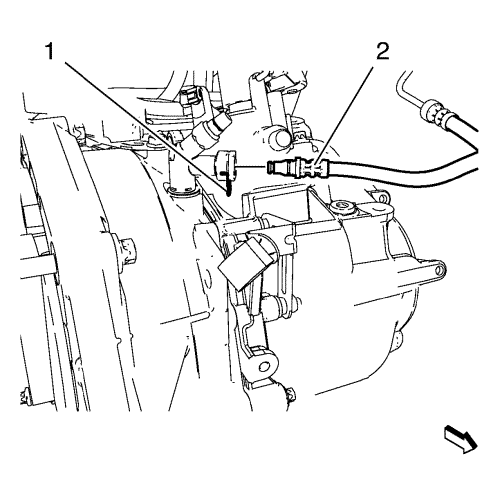
Note: Before disconnecting the clutch actuator cylinder front pipe, remove the clutch/brake fluid from the reservoir tank.
- Remove the clutch actuator cylinder front pipe retaining clip (1).
- Disconnect the clutch actuator cylinder front pipe (2) from the clutch actuator cylinder pipe elbow.
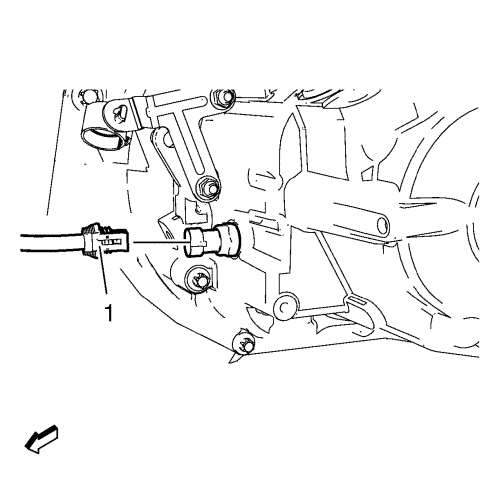
- Disconnect the electrical connector (1) from the reverse lamp switch.
- Remove the Charge Air Cooler Outlet. Refer to Charge Air Cooler Outlet Duct Replacement .
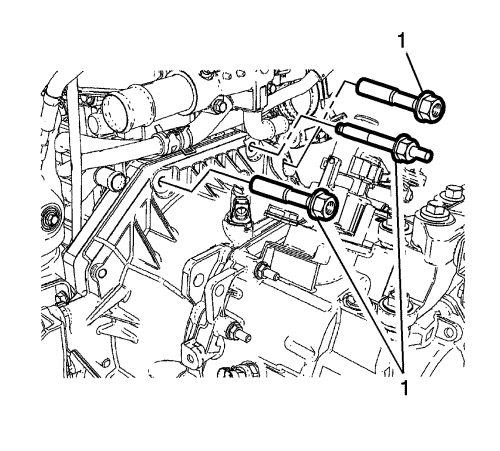
- Remove the upper transmission bolts (1).
- Install the engine support fixture. Refer to Engine Support Fixture .
- Remove the exhaust particulate filter. Refer to
Exhaust Particulate Filter Replacement : LNQ .
- Drain the transmission fluid. Refer to Transmission Fluid Replacement .
- Remove the frame. Refer to Frame Replacement .
- Remove the transmission front mount. Refer to Transmission Front Mount Replacement .
- Remove the rear transmission mount bracket. Refer to
Transmission Rear Mount Bracket Replacement : FWD → AWD .
- Remove the front wheel drive shaft from the transmission. Refer Front Wheel Drive Shaft Replacement .
- If equipped with an FWD, remove the intermediate shaft. Refer to Intermediate Shaft Replacement .
- If equipped with an AWD, remove the transfer case from the transmission. Refer to Transfer Case Assembly Replacement .
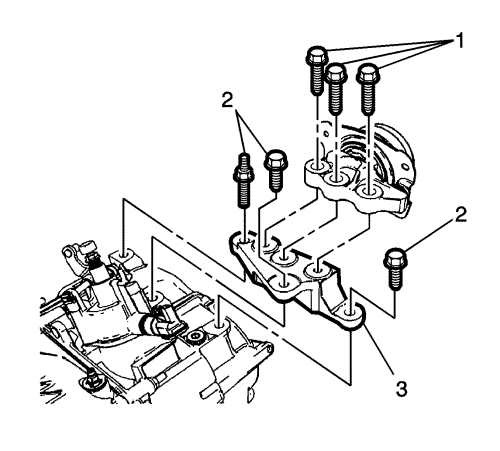
- Remove the left transmission mount bracket (3). Refer to Transmission Mount Bracket Replacement - Left Side
- Use a transmission jack in order to support the transmission.
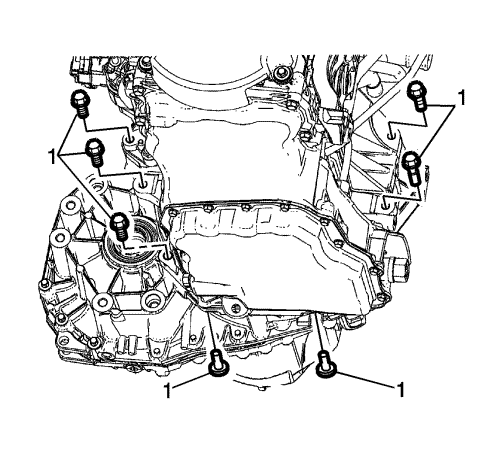
- Remove the lower transmission to engine bolts (1).
- Separate the transmission from the engine.
- Lower the transmission with the transmission jack far enough to remove the transmission.
Installation Procedure
- Raise the transmission with the transmission jack and position the transmission to the engine.
Caution: Refer to Fastener Caution in the Preface section.
- Install the lower transmission to engine bolts (1) and tighten to58N·m(43 lb ft).
- Remove the transmission jack.
- Install the left transmission mount bracket (3). Refer to Transmission Mount Bracket Replacement - Left Side
- If equipped with an FWD, install the intermediate shaft. Refer to Intermediate Shaft Replacement
- If equipped with an ADD, install the transfer case to the transmission. Refer to Transfer Case Assembly Replacement .
- Install the front wheel drive shaft to the transmission. Refer to Front Wheel Drive Shaft Replacement .
- Install the rear transmission mount bracket. Refer to
Transmission Rear Mount Bracket Replacement : FWD → AWD .
- Install the transmission front mount. Refer to Transmission Front Mount Replacement
- Install the frame . Refer to Frame Replacement .
- Install the exhaust particulate filter. Refer to
Exhaust Particulate Filter Replacement : LNQ .
- Remove the engine support fixture. Refer to Engine Support Fixture .
- Install the upper transmission to engine bolts (1) and tighten to 58N·m(43 lb ft).
- Install the Charge Air Cooler Outlet Duct. Refer to Charge Air Cooler Outlet Duct Replacement .
- Connect the electrical connector (1) to the reverse lamp switch.
- Connect the clutch actuator cylinder front pipe (2) to the clutch actuator cylinder pipe elbow
- Lock the clutch actuator cylinder front pipe retaining clip (1).
- Install the shift lever and selector lever cable (2) to the shift lever and selector lever cable bracket (1).
- Install the shift lever and selector lever cable (2) to the transmission control housing (3).
- Connect the electrical connector to the transmission control housing (3).
- Adjust the gear lever and selector lever cables. Refer to Manual Transmission Shift Lever Cable Adjustment .
- Fill the transmission with fluid. Refer to Transmission Fluid Replacement .
- Install the radiator surge tank. Refer to
Radiator Surge Tank Replacement : Diesel → Gasoline Engines .
- Bleed the clutch hydraulic system. Refer to Hydraulic Clutch System Bleeding .
- Fill the clutch fluid reservoir with clutch/brake fluid up to the MAX level.
- Install the battery and battery tray. Refer to Battery Tray Replacement
- Road test the vehicle.
| © Copyright Chevrolet. All rights reserved |


