To the top of the document
Captiva
   
GMDE Start Page Load static TOC Load dynamic TOC Help?

Engine Replacement - LE5 or LE9

Removal Procedure

  1. Disconnect the negative battery cable. Refer to Battery Negative Cable Disconnection and Connection .
  2. Remove the bonnet. Refer to Bonnet Replacement .
  3. Recover the refrigerant. Refer to Refrigerant Recovery and Recharging .
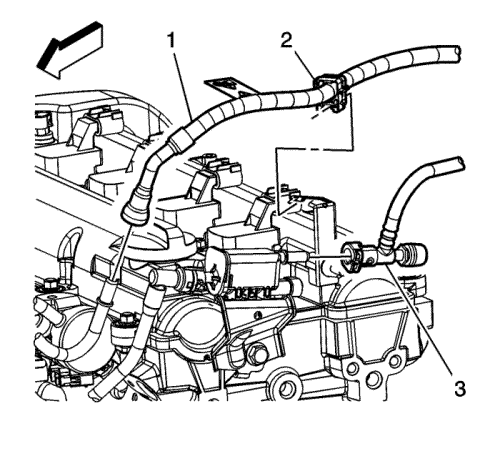
  4. 1683133
  5. Relieve the fuel system pressure. Refer to Fuel Pressure Relief : Without CH 48027-100  → CH 48027-100 .
  6. Remove the air cleaner outlet duct. Refer to Air Cleaner Outlet Duct Replacement : LE5 or LE9 .
  7. Remove the air cleaner assembly. Refer to Air Cleaner Assembly Replacement : LE5 or LE9 .
  8. Disconnect the fuel feed pipe (1) quick connect fitting at the fuel rail. Refer to Metal Collar Quick Connect Fitting Service .
  9. Disconnect the evaporative emission (EVAP) line (3) quick connect fitting from the EVAP purge solenoid. Refer to Plastic Collar Quick Connect Fitting Service .
  10. Remove the fuel feed pipe clip (2) from the fuel line bracket.
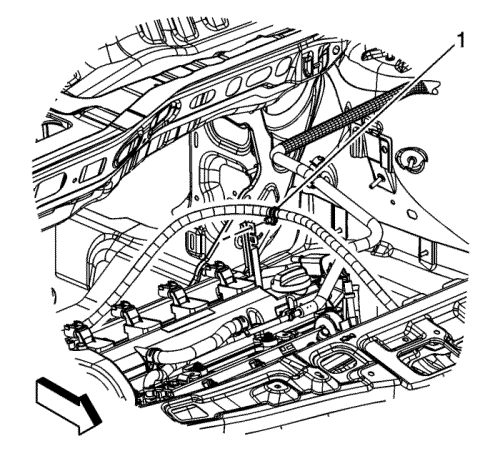
  11. 1834359
  12. Remove the transaxle shift cable clip (1) from the fuel line bracket.
  13. Remove the bolts from the engine control module and position aside. Refer to Engine Control Module Replacement : LE5, LE9 or LAF .
  14. Remove the battery. Refer to Battery Replacement .
  15. Remove the exhaust manifold heat shield. Refer to Exhaust Manifold Heat Shield Replacement : LE5 .
  16. Remove the oxygen sensors. Refer to Heated Oxygen Sensor Replacement - Sensor 1 : LE5, LE9 or LAF and Heated Oxygen Sensor Replacement - Sensor 2 : LE5, LE9 or LAF .
  17. Remove the throttle body. Refer to Throttle Body Assembly Replacement : LE5 or LE9 .
  18. Remove the engine oil level indicator.
  19. Raise and support the vehicle. Refer to Lifting and Jacking the Vehicle .
  20. Remove the front wheels and tyres. Refer to Tyre and Wheel Removal and Installation .
  21. Drain the cooling system. Refer to Cooling System Draining and Filling .
  22. Drain the engine oil. Refer to Engine Oil and Oil Filter Replacement : LE5 or LE9 .
  23. Lower the vehicle.

  24. 1810786
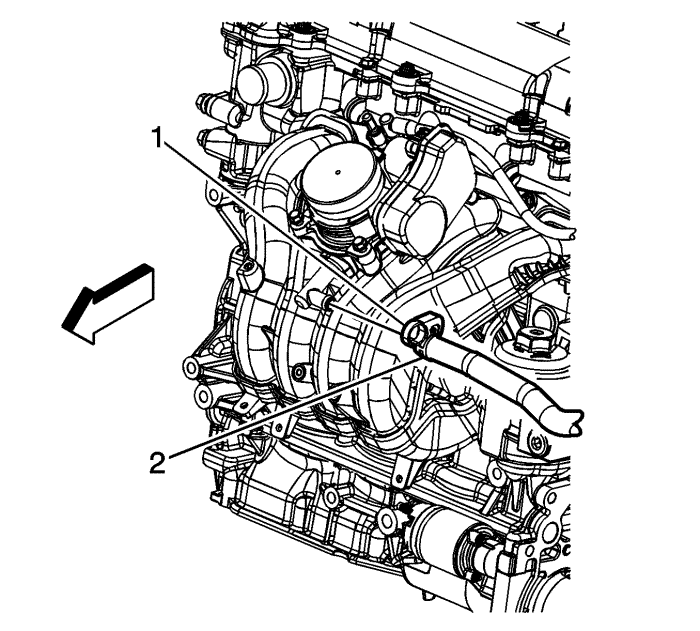
  25. Reposition the vacuum brake booster hose clamp (1) at the intake manifold.
  26. Remove the vacuum brake booster hose (2) from the intake manifold. Reposition the brake booster hose out of the way.
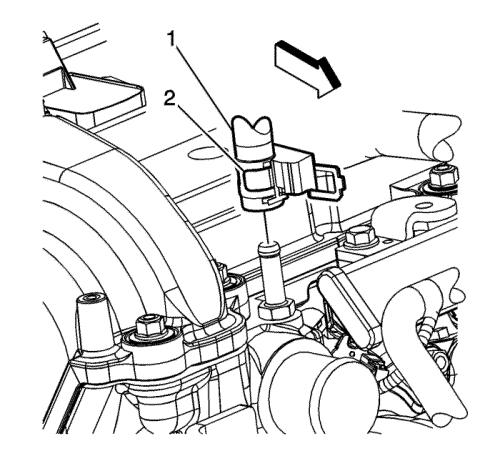
  27. 1812505
  28. Remove the coolant recovery inlet hose clamp (2) at the cylinder head.
  29. Remove the coolant recovery inlet pipe clip from the fuel rail.
  30. Remove the coolant recovery inlet hose (1) from the cylinder head. Reposition the hose/pipe out of the way.
  31. Remove the radiator inlet hose from the cylinder head. Refer to Radiator Inlet Hose Replacement : Diesel  → V6  → LE5 .
  32. Remove the radiator outlet hose. Refer to Radiator Outlet Hose Replacement : Diesel  → V6  → LE5 .
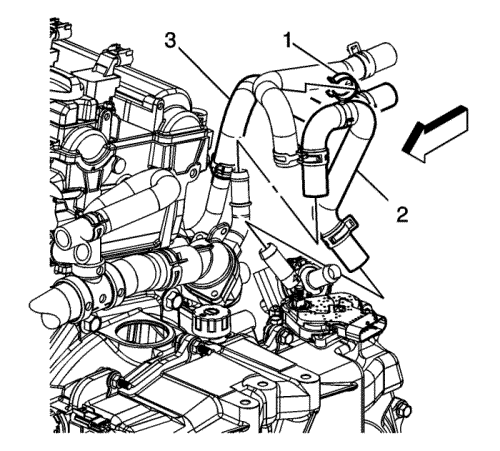
  33. Remove the heater inlet hose (3) from the thermostat housing.
  34. Remove the coolant recovery reservoir/heater inlet hose (2) from the thermostat housing.
  35. Raise and support the vehicle. Refer to Lifting and Jacking the Vehicle .
  36. Disconnect the engine wiring harness electrical connector (2) from the air conditioning (A/C) compressor.
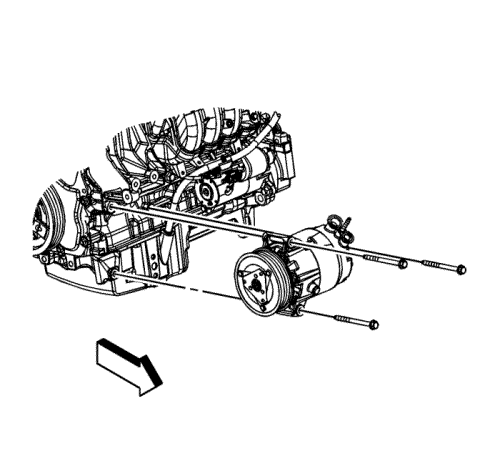
  37. 1811970
  38. Unbolt the A/C compressor and reposition it out of the way.
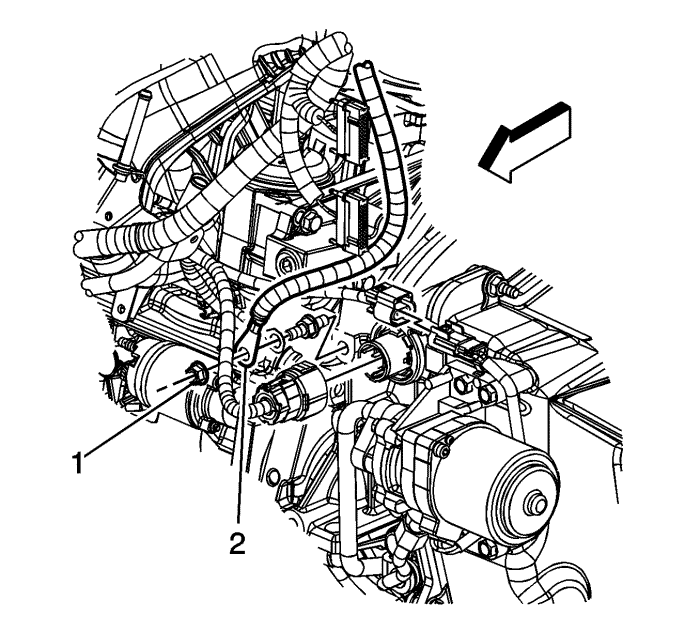
  39. 1813437
  40. Remove the engine wiring harness ground lead nut (1) from the transaxle stud.
  41. Remove the negative battery cable lead (2) from the transaxle stud. Reposition the negative battery cable out of the way.
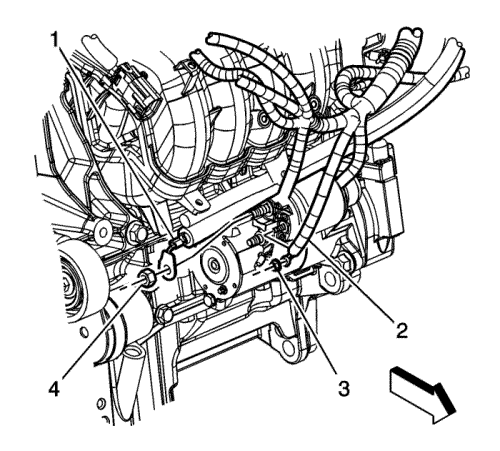
  42. 1813964
  43. Remove the positive battery cable to the starter motor nut (4).
  44. Remove the positive battery cable lead (1) from the starter motor.
  45. Remove the positive battery cable from in between the starter and the engine. Reposition the positive battery cable out of the way.
  46. Lower the vehicle.
  47. Disconnect engine wiring harness electrical connectors as necessary.
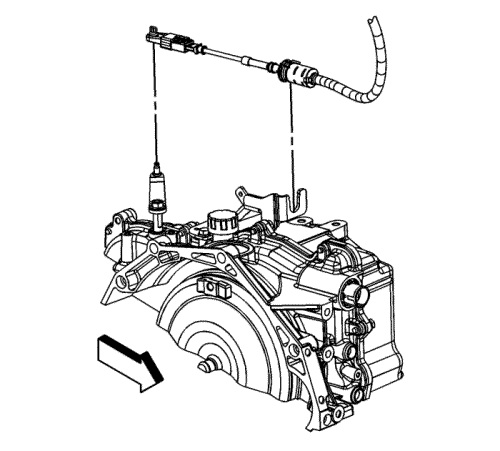
  48. 1834362
  49. Remove the transaxle shift cable from the range select lever.
  50. Release the shift control cable retaining clip and remove the cable from the shift control cable bracket.
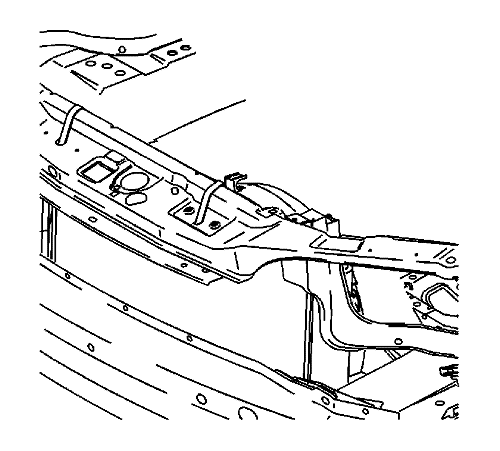
  51. 857193

    Note: The radiator/condenser/fan assembly will stay in the vehicle during engine removal.

  52. Using long tie straps, secure the radiator/condenser/fan assembly to the radiator support.
  53. Raise the vehicle.
  54. Remove the front wheel housing liners. Refer to Front Wheelhouse Liner Replacement .
  55. Note: A piece of hardwood should be used between the transaxle and the engine cradle. This wood will support the engine when the left side engine mount bolts are removed.

  56. Install a piece of hardwood 1 x 2 x 4 between the transaxle and the engine cradle.
  57. Note: A piece of hardwood should be used between the sump and the engine cradle. This wood will support the engine when the right side engine mount bolts are removed.

  58. Install a piece of hardwood 1 x 2 x 4 between the sump and the engine frame.
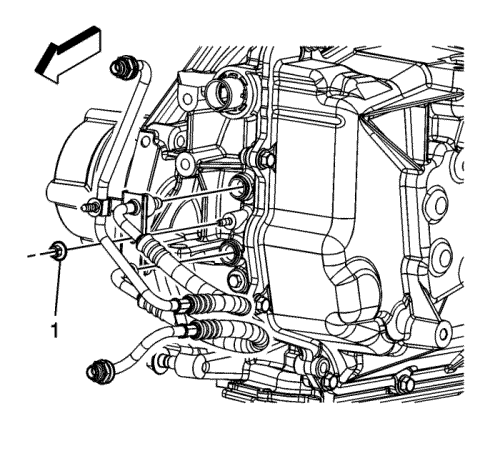
  59. 1847469
  60. Drain the transaxle fluid.
  61. Remove the transaxle oil cooler line to transaxle nut (1).
  62. Remove the transaxle oil cooler lines from the transaxle.
  63. Remove the catalytic converter. Refer to Catalytic Converter Replacement : LE5 .
  64. Remove the intermediate to steering gear pinch bolt and disconnect the intermediate shaft from the steering gear. Discard the pinch bolt. Refer to Intermediate Steering Shaft Replacement .
  65. Separate the outer tie rods from the steering knuckles. Refer to Steering Linkage Outer Track rod Replacement .
  66. Disconnect the stabilizer links from the stabilizer shaft. Refer to Stabilizer Shaft Link Replacement .
  67. Separate the ball joints from the steering knuckles. Refer to Lower Control Arm Ball Joint Replacement .
  68. Remove the wheel drive shafts. Refer to Front Wheel Drive Shaft Replacement .
  69. Lower the vehicle.

  70. 1810250
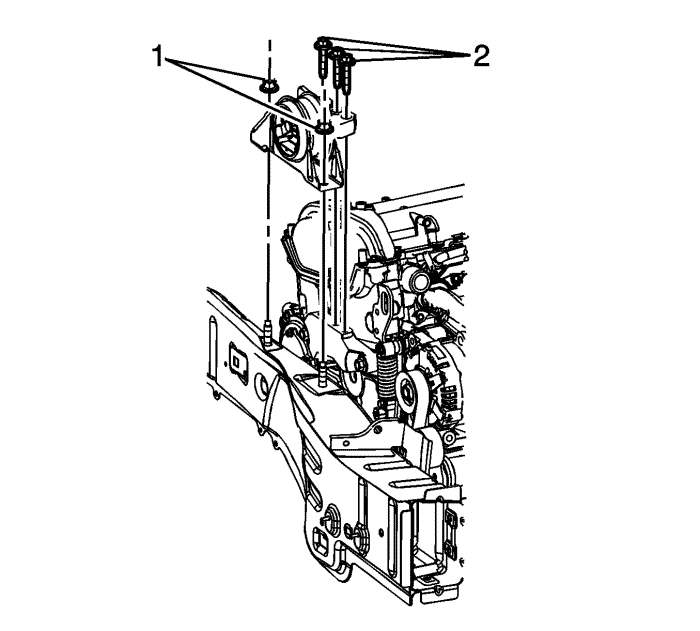
  71. Remove the engine mount to engine mount bracket bolts (2).
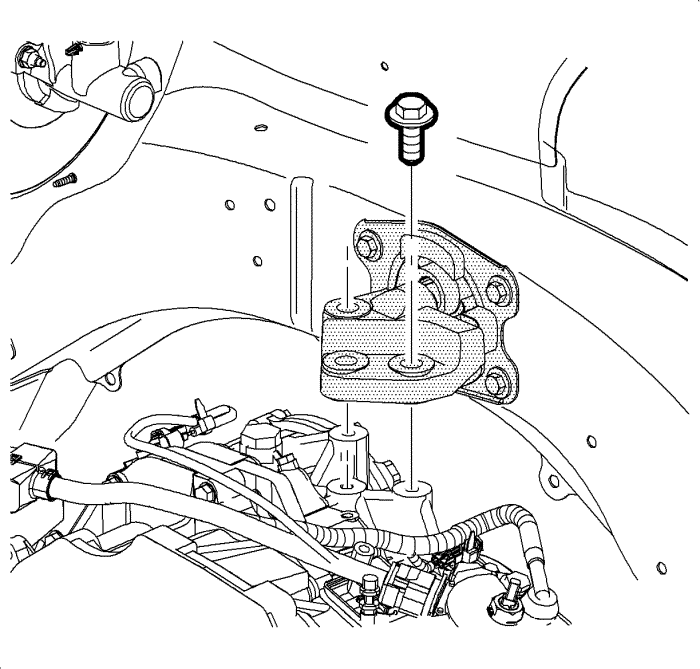
  72. 928777
  73. Remove the transaxle mount to transaxle adapter bolts.
  74. Raise the vehicle.

  75. 952078

    Note: During the powertrain removal support the vehicle body by placing a jack at the rear of the vehicle.

  76. Position an engine support table under the powertrain assembly.
  77. Note: Blocks of wood can be used between the front of the frame and the sump to table in order to level the powertrain during removal.

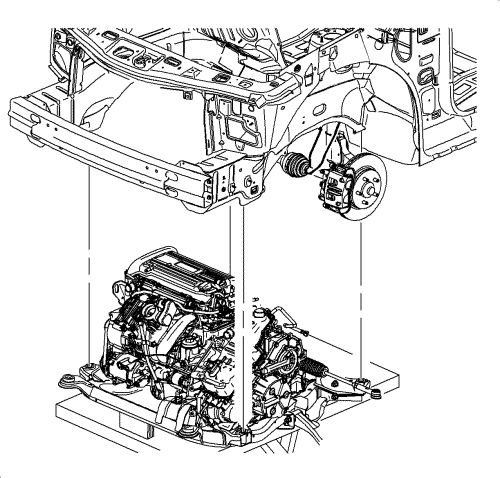
  78. With the table positioned, fully raise the table to contact with the powertrain assembly.
  79. Remove the frame to body bolts. Discard the bolts.
  80. Note: When lowering the engine/transaxle assembly, verify all brake lines, shifter cables and other components are free during removal.

  81. Lower the engine table and raise the body on the hoist until the engine/transaxle and cradle are free from the vehicle.
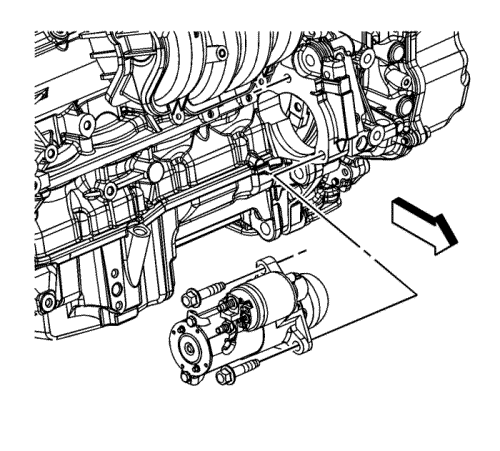
  82. 1814106
  83. Remove the starter motor bolts and starter.
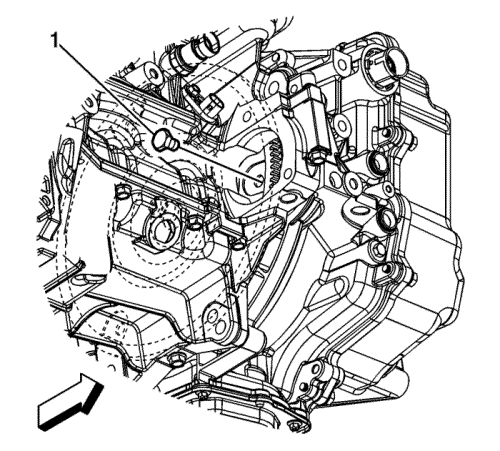
  84. 1847524
  85. Remove the torque converter to flex plate bolts (1).
  86. Install a suitable lifting device to the engine.
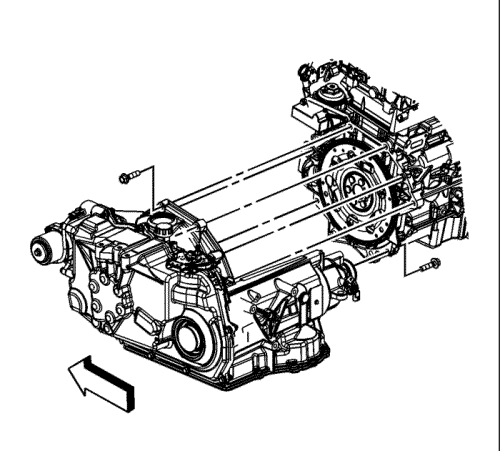
  87. 1847526
  88. Remove the transaxle bolts from the engine.
  89. Separate the engine from the transaxle.
  90. Install the engine to a suitable engine stand.

Installation Procedure


    1847526
  1. Install a suitable lifting device to the engine.
  2. Using the lifting device, position and install the engine to the transaxle.
  3. Caution: Refer to Fastener Caution in the Preface section.

  4. Install the transaxle bolts to the engine and tighten the bolts to 75 N·m (55 lb ft).

  5. 1847524
  6. Install the torque converter to flex plate bolts (1) and tighten to 60 N·m (44 lb ft).
  7. Remove the engine lifting device.

  8. 1814106
  9. Install the starter motor and bolts and tighten the bolts to 53 N·m (39 lb ft).

  10. 952078
  11. Position the powertrain and support table under the vehicle.
  12. Raise the powertrain into position under the vehicle.
  13. With the table positioned, if required, lower the vehicle over the powertrain.
  14. Align the lower radiator pins with the frame. Ensure all hoses and electrical harnesses are correctly routed and free from the loading path of the powertrain.
  15. Install the NEW frame to body bolts and tighten to 155 N·m (114 lb ft).
  16. Lower the vehicle.

  17. 928777
  18. Install the transaxle mount to transaxle adapter bolts and tighten to 55 N·m (41 lb ft).

  19. 1810250
  20. Install the engine mount to the engine mount bracket bolts (2).
  21. Tighten the engine mount to bracket bolts in the following sequence:
  22. 15.1. Middle
    15.2. Rear
    15.3. Front

    Tighten the bolts to 50 N·m (37 lb ft).

  23. Raise and support the vehicle.
  24. Install the wheel drive shafts. Refer to Front Wheel Drive Shaft Replacement .
  25. Install the control arm ball joints into the steering knuckles. Refer to Lower Control Arm Ball Joint Replacement .
  26. Connect the stabilizer links to the stabilizer shaft and install the stabilizer link to stabilizer shaft nuts. Refer to Stabilizer Shaft Link Replacement .
  27. Connect the outer tie rods to the steering knuckles. Refer to Steering Linkage Outer Track rod Replacement .
  28. Position the intermediate shaft to the steering gear and install a NEW pinch bolt. Refer to Intermediate Steering Shaft Replacement .
  29. Install the catalytic converter. Refer to Catalytic Converter Replacement : LE5 .

  30. 1847469
  31. Install the transaxle oil cooler lines to the transaxle.
  32. Install the transaxle oil cooler line to transaxle nut (1) and tighten to 4 N·m (27 lb in).
  33. Remove the wood from between the sump and the engine cradle.
  34. Remove the wood from between the transaxle and the engine cradle.
  35. Install the front wheel housing liners. Refer to Front Wheelhouse Liner Replacement .
  36. Install the front wheels and tyres. Refer to Tyre and Wheel Removal and Installation .
  37. Lower the vehicle.

  38. 857193
  39. Loosen and position the radiator/condenser/fan assembly.

  40. 1834362
  41. Install the shift control cable to the shift control cable bracket and engage the shift control cable retaining clip.
  42. Install the transaxle shift cable to the range select lever.
  43. Raise and support the vehicle.
  44. Install the oxygen sensors. Refer to Heated Oxygen Sensor Replacement - Sensor 1 : LE5, LE9 or LAF and Heated Oxygen Sensor Replacement - Sensor 2 : LE5, LE9 or LAF .
  45. Install the exhaust manifold heat shield. Refer to Exhaust Manifold Heat Shield Replacement : LE5 .

  46. 1813964
  47. Position and install the positive battery cable between the starter and the engine.
  48. Install the positive battery cable lead (1) to the starter motor.
  49. Install the positive battery cable to starter motor nut (4) and tighten the nut to 9 N·m (80 lb in).

  50. 1813437
  51. Position the negative battery cable and install the negative battery cable lead (2) to the transaxle stud.
  52. Install the engine wiring harness ground lead nut (1) to the transaxle stud and tighten the nut to 50 N·m (37 lb ft).

  53. 1811970
  54. Position the A/C compressor and install the bolts and tighten to 50 N·m (37 lb ft).
  55. Connect the engine wiring harness electrical connector (2) to the A/C compressor.
  56. Lower the vehicle.
  57. Connect the engine wiring harness electrical connectors as necessary.

  58. 1812209
  59. Install the coolant recovery reservoir/heater inlet hose (2) to the thermostat housing.
  60. Install the heater inlet hose (3) to the thermostat housing.
  61. Install the radiator inlet hose. Refer to Radiator Inlet Hose Replacement : Diesel  → V6  → LE5 .
  62. Install the radiator outlet hose. Refer to Radiator Outlet Hose Replacement : Diesel  → V6  → LE5 .

  63. 1812505
  64. Position and install the coolant recovery inlet hose (1) to the cylinder head.
  65. Install the coolant recovery inlet pipe clip to the fuel rail.

  66. 1810786
  67. Position and install the vacuum brake booster hose (2) to the intake manifold.
  68. Install the battery. Refer to Battery Replacement .

  69. 1834359
  70. Install the transaxle shift cable clip (1) to the fuel line bracket.

  71. 1683133
  72. Install the throttle body. Refer to Throttle Body Assembly Replacement : LE5 or LE9 .
  73. Install the fuel feed pipe clip (2) to the fuel line bracket.
  74. Connect the EVAP line (3) quick connect fitting to the EVAP purge solenoid. Refer to Plastic Collar Quick Connect Fitting Service .
  75. Connect the fuel feed pipe (1) quick connect fitting at the fuel rail. Refer to Metal Collar Quick Connect Fitting Service .
  76. Install the air cleaner outlet duct. Refer to Air Cleaner Outlet Duct Replacement : LE5 or LE9 .
  77. Install the air cleaner assembly. Refer to Air Cleaner Assembly Replacement : LE5 or LE9 .
  78. Fill the cooling system. Refer to Cooling System Draining and Filling .
  79. Fill the transaxle with fluid. Refer to Transmission Fluid Replacement .
  80. Refill the engine with oil. Refer to Engine Oil and Oil Filter Replacement : LE5 or LE9 .
  81. Recharge the A/C system. Refer to Refrigerant Recovery and Recharging .
  82. Start the engine and allow the engine to run, inspect for leaks. Correct as necessary.
  83. Install the bonnet. Refer to Bonnet Replacement .


© Copyright Chevrolet. All rights reserved